Preface
Coming from Laravel, which has a myriad of built-in features I started to resent shifting to NodeJS. Setting up error handling, logging, dependency injection, etc. was not what I had in mind. Thankfully I found NestJS, with its out-of-the-box architecture and great documentation I started feeling at home again.
SequelizeJS is an ORM that offers connectivity to relational databases like MySQL, PostgreSQL, and MSSQL. For this article, I’m going to use MySQL hosted on RemoteMySQL, but you can use any relational database you like.
Getting Started
Assuming you have a nest project ready to go. We’ll start by installing the following dependencies.
npm install --save sequelize sequelize-typescript mysql2
npm install --save-dev @types/sequelize
First, we’ll pass the connection details to SequelizeJS. We can do this by creating a database module and provider.
nest generate module database
nest generate provider database/database.providers
This is where we will add our entity models to SequelizeJS. I’m adding models right now (even though they are created yet), but you can do this later.
import { Module } from "@nestjs/common"
import { databaseProviders } from "./database.providers"
@Module({
  providers: [...databaseProviders],
  exports: [...databaseProviders],
})
export class DatabaseModule {}
I have imported and added the user model to the addModels function. Now export your database provider so it can be consumed with any module that needs to access the database through SequelizeJS.
import { User } from "./user.entity"
import { USER_REPOSITORY } from "../utils/constants"
export const userProviders = [
  {
    provide: USER_REPOSITORY,
    useValue: User,
  },
]
User Entity Model
import { Injectable, Inject } from "@nestjs/common"
import { USER_REPOSITORY } from "../utils/constants"
import { User } from "./user.entity"
import { CreateUserDto } from "./dto/index"
@Injectable()
export class UserService {
  constructor(
    @Inject(USER_REPOSITORY) private readonly userRepository: typeof User
  ) {}
  async getAllUsers(): Promise<User[]> {
    return await this.userRepository.findAll<User>()
  }
  async createUser(createUser: CreateUserDto): Promise<User> {
    return await this.userRepository.create<User>(createUser)
  }
}
I’m not going to explain how the code above populates the database table and its attributes. If you’re interested in learning more about SequelizeJS, you can look here.
Next, we’ll create user.provider.ts which will be used to export the User model so it can be used in different services.
import { User } from "./user.entity"
import { USER_REPOSITORY } from "../utils/constants"
export const userProviders = [
  {
    provide: USER_REPOSITORY,
    useValue: User,
  },
]
The USER_REPOSITORY is stored in a const variable, in a separate file, so it can be used anywhere without being subject to human error.
At this point, we’re done with our database and SequelizeJS configuration. From now on it’s just a matter of importing database and its models and using them 😀.
Onwards with the Code
Let’s move on and create our user module, controller and service with the following command.
nest generate module user
nest generate controller user
nest generate service user
These are the files responsible for entertaining recurring database requests. But first we’ll create a Data Transfer Object (DTO), this is especially useful for validating body of the incoming HTTP request or building API documentation with swagger, etc.
export class CreateUserDto {
  readonly name: string
  readonly age: number
  readonly email: string
}
User Module
import { Module } from "@nestjs/common"
import { UserService } from "./user.service"
import { UserController } from "./user.controller"
import { DatabaseModule } from "../database/database.module"
import { userProviders } from "./user.providers"
@Module({
  imports: [DatabaseModule],
  controllers: [UserController],
  providers: [UserService, ...userProviders],
})
export class UserModule {}
The above code is consolidating all the User code (controller, service, model) into one place, the user module so it can be exported to the app module.
Note that the user controller and service have been generated but are empty right at this step. You can opt to populate this file later on.
User Service
import { Injectable, Inject } from "@nestjs/common"
import { USER_REPOSITORY } from "../utils/constants"
import { User } from "./user.entity"
import { CreateUserDto } from "./dto/index"
@Injectable()
export class UserService {
  constructor(
    @Inject(USER_REPOSITORY) private readonly userRepository: typeof User
  ) {}
  async getAllUsers(): Promise<User[]> {
    return await this.userRepository.findAll<User>()
  }
  async createUser(createUser: CreateUserDto): Promise<User> {
    return await this.userRepository.create<User>(createUser)
  }
}
Unlike user service which uses the “Injectable” decorator, the user provider we created to use the User Model is not a part of NestJS, therefore has to be injected manually.
We do this inside the service’s constructor method using the “Inject” decorator.
User Controller
import { Controller, Get, Post, Body } from "@nestjs/common"
import { UserService } from "./user.service"
import { User } from "./user.entity"
@Controller("user")
export class UserController {
  constructor(private readonly userService: UserService) {}
  @Get()
  public async getUsers(): Promise<User[]> {
    return this.userService.getAllUsers()
  }
  @Post()
  public async createUser(@Body() body): Promise<User> {
    return this.userService.createUser(body)
  }
}
The last step is to inject the user service in our user controller. The controller exposes our code base to externally accessible API endpoints.

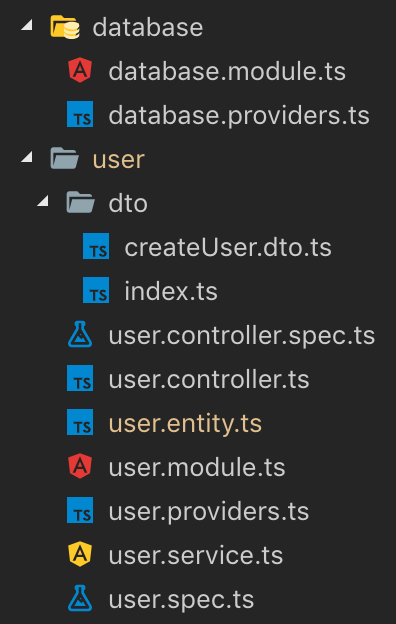
If you’re curious, this is how my folder structure looks like.
The database connection details are in the database folder, easy to maintain and reuse anywhere in the app.
The bulk of the files are in the user folder. You can ignore the .spec files as they are used to host tests that are out of the scope of this article.
The dto folder holds “data transfer objects” for each request. The index file is used to export all dto-s.
